

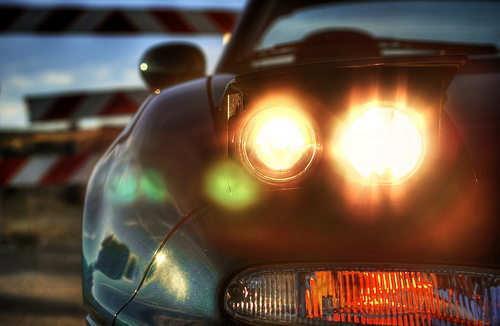
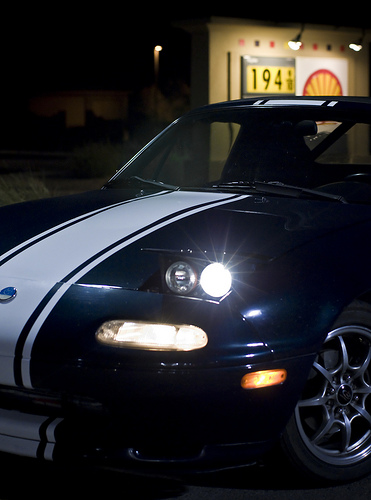
Can you imagine this shot with STOCK headlights?
Quick info on the Moss Low-pros
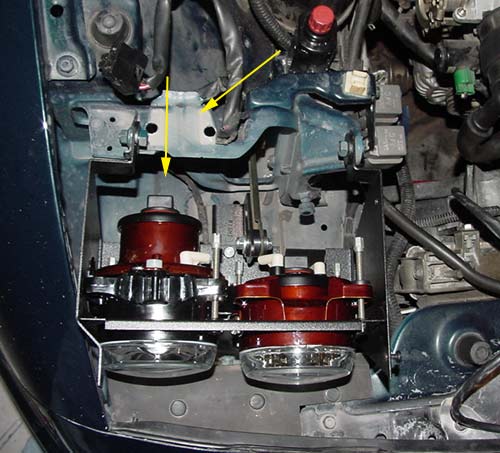
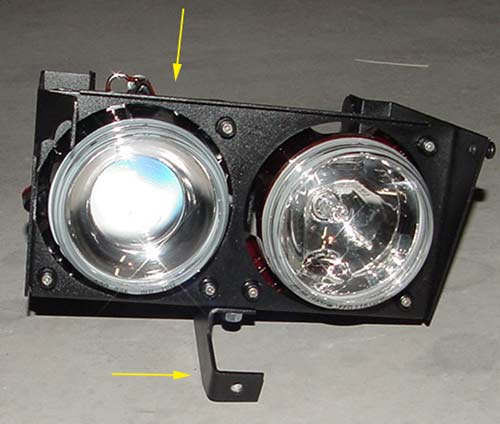
These headlights are great. Like really really great. They use the excellent Hella 90mm H9 projectors for the
low beam and the same in a reflector housing for the high beam. The build quality of the housing is top notch and
would be rather hard to duplicate for the total price of the units.
And then there's the wiring.
The Moss headlight wiring is very sad. It consists of six 6-inch pigtails to go from each individual plug in the stock
wiring harness to each prong on the back of the H9 bulbs. Sad. They don't even give you H9 connectors; you're expected
to connect terminals onto your bulbs. SAD. But the good news is that you can easily fix this oversight and bring your
dual beam headlight kit up to spec.
One more thing... Why I like the H9 dual beam units more than H4-based E-codes:
- Aftermarket ECE (like Cibies) lights use H4 bulbs. Moss's low pro kit uses H9 bulbs.
- Cibie/Hella E-codes have two bulbs total. There are four bulbs in a dual beam kit.
- An H4 bulb puts out 1650-1895 lumens in high-beam mode and 1000-1200 lumens in low-beam mode at 13.5 volts (the standard measured voltage for H4 bulbs) for a total possible light output of 3790 lumens.
- The industry standard H9 bulb puts out 1870 lumens at 12.7 volts. H9 bulbs have only one filament, so there's no high/low rating.
- Powering all four H9 bulbs at once in high beam mode gives a total output of 7480 lumens. That's at only 12.7 volts. Many cars can achieve this from battery power alone. When the car is running and the alternator is charging, you're more likely to see around 14.2 volts at the bulbs if you have nice, beefy wiring installed.
- A final benefit of the Moss kit over any 7" kit: no shakes. I had Cibies installed for over a year. I loved the light output, but I could never quite get them to not shake over bumps. The Moss kit comes with some really nice bracing, which totally eliminates shaky lights.
Your Shopping List
- We'll assume you have your headlight kit (Moss or otherwise) all purchased in advance. One thing about the Rallylights links - they might not work. In a year, they've changed these links at least three times. The parts numbers usually work though. You might have to resort to copy and paste.
- Wire - 1 spool (20 feet or whatever they sell) of 10-14 gauge wire. 14 gauge will work fine, but I like 10 gauge. You might splurge and get a spool of red and a spool of black.
- Two SPST relays with dual output terminals (30-40amps/12 volts) - Rallylights.com part number HL87453 - 4RA 960 010-67. That's a Single Pole Single Throw relay with two outputs (dual 87). You can find one here.
- Two relay bases - rallylights.com part number HL87123. Like the relays, these is also available here.
- One fuse box - rallylights.com part number HL62936. You can get any size you want. I chose the four-fuse box.
- Four H9 sockets - rallylights.com part number HL87193. Since Moss didn't feel fit to include them... Get them here.
- One H4 male socket - rallylights.com part number CPH4CM. This is optional, but makes for a nice install. Get it here.
- One 3 amp barrel diode - radioshack.com part number 276-1144. I picked this up at a local Radio Shack. The website has one here.
- Lots of black wire loom to protect your wiring.
- Four female 10-12 gauge insulated spade connectors.
- MANY 10-12 gauge insulated butt connectors (I used around 10).
- Electrical tape.
- Zip ties.
- A GOOD crimping tool that can do insulated and non-insulated connectors, a wire stripper, and wire cutters.
Low Profile Headlight Wiring Upgrade
Step 1: Battery.
Disconnect the negative cable from your battery. You'll be playing around in the factory fuse box with the main wire. Disconnect that battery!
This might take a while. You'll open up your factory under-hood fuse box and remove both gold bolts holding it in place on the fender. Then you'll remove the main bolt in the center of the box. Why? You're gonna run two big wires out from that bolt to your new fuse block.
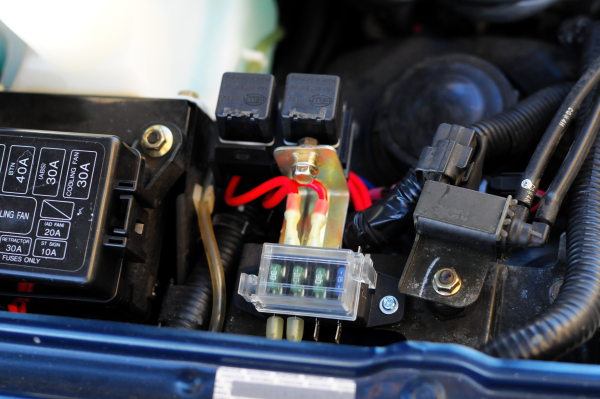
Spend some time deciding where to mount your new fuse block. There is a nice blank area on the firewall, but that's an extra foot away from your headlights. My 95 is missing some emissions equipment that later cars have (the EGR boost sensor) so I was able to mount the new fuse box directly in front of the factory box. I then made a bracket to hang the relays a few inches away from the new fuse block. The above picture shows what I'm talking about.
Now, wire your new fuse box up to the main bolt in the factory fuse box. I used 10 gauge wire and two ring terminals to connect to the main bolt. Two runs of about eight inches each was all that I needed. The new fuse box uses blade terminals, so I crimped those on. I'm a big fan of crimps in this sort of application. A well-done crimp is a lot stronger than a soldered connection. The terminals I used have a built in section of heat shrink tubing to make for a very strong and weather-tight connection.

This step is *most* of the work you'll be doing in the whole project. You'll be building the wiring harness for your relay blocks. If you've never crimped non-insulated connectors before, you're in for a treat. I suggest picking up some extra terminals from radio shack and practicing. Aside from that, just keep referring back to the relay diagram and work slowly.
I used 10 gauge wire for the dual 87 outputs to the Hella headlights. You're probably fine using stuff as thin as 14 gauge, but I wanted some beefy wires. I ran about one foot wire leads off each headlight output terminal and then crimped on butt connectors from there to connect the headlights. For the grounds, just use small (18ish) gauge cable and wire from the relays to the ground wire on your stock passenger-side headlight connector. And for the pin 30 input connectors, two six inch runs of 10 gauge should be enough to cover the distance.
Slightly more difficult is the relay input. To power all four headlights at once in the high beam mode, you'll split the high beam input (from the factory headlight plug) to *both* relays. The low beam input will connect only to the low beam relay. However, this now creates a circuit between both headlight positions that makes all four lights come on regardless of which beam you have selected. To fix this, you'll put a diode between the high beam input and the low beam relay. I might have the direction of the diode reversed in my diagram. Don't make this connection permanent until you've verified the direction of the diode.
Follow the Moss directions, or whoever you bought your dual-beam kit from, and install your headlights. The process is pretty easy except for drilling out the stock headlight brace. That can be difficult, but a strong drill and a big drill bit will make easy work of it. Actually installing the headlights is only about 10% of the work of this job. The wiring really eats your time and energy.
Step 5: Wire in your headlights.
Finally, you get to run your main headlight wires and crimp on the H9 connectors. After crimping up your relay blocks, the H9 connectors should be no problem for you. Be warned: the little individual wire dust seals BARELY fit on 10 gauge wire. They'd like 14 gauge much more than 10 gauge. It's not that big a deal though, I made 10 gauge work just fine.
I chose to run a span of power wires across the top of the radiator fan mounts back to the fuse box and protect it with black wire loom. I then grounded each bulb (driver's side) to a bolt on the fender near the air box. On the passenger side, I grounded each bulb to the main alternator ground beside the throttle body. The power wires for these two bulbs then got bundled with the driver's side and met up with the relays. Four butt connectors with heat shrink tube made the final connection.
Step 6: Light 'em up!
Now is the time to reconnect your battery and turn on the lights. Good luck! If you have some strangeness with the low beam / high beam, reverse your diode. Once you get it right, finalize your diode connection and seal up all your heat shrink connectors. Then go crazy with the wire loom hiding and protecting your wires.
Congrats, and enjoy your new headlights.
Additional pictures

Site Navigation
Latest Blog Posts
Where’s all the blog posts?!?!
Posted on Fri, 27 Jun 2025 19:59:51 +0000
 Why are you seeing 2013 blog posts in the "new posts" list? It's been a hard month for the revlimiter site.
Read more...
Mabel
Posted on Sat, 29 Jun 2024 03:42:43 +0000
 Who’s the dog that keeps showing up on the revlimiter Instagram? It’s Mabel, my ACD/Pomeranian service dog.
Read more...
CarbonMiata Vent Window Install/Review
Posted on Sun, 29 Jan 2023 14:57:01 +0000
 After waiting 23 years, there’s finally a pretty vent window kit on the market for the NA/NB Miata. Unfortunately, it doesn’t actually work well.
Read more...
NA Miata Ignition Switch Replacement / Refurbish
Posted on Fri, 12 Mar 2021 19:25:57 +0000
 Is your NA Miata not starting anymore? A bad ignition switch may be the problem.
Read more...
XIDA ND Suspension Install
Posted on Mon, 20 May 2019 20:01:01 +0000
 Mona dumps the soft GT suspension in favor of a set of XIDAs from Supermiata.
Read more...