
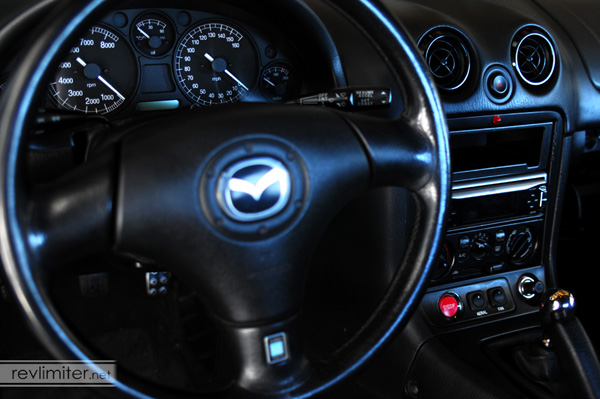
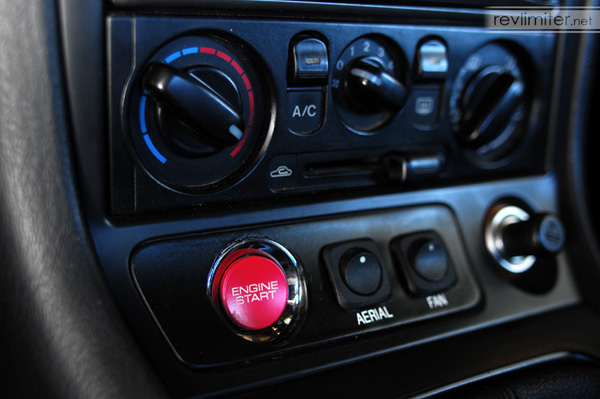
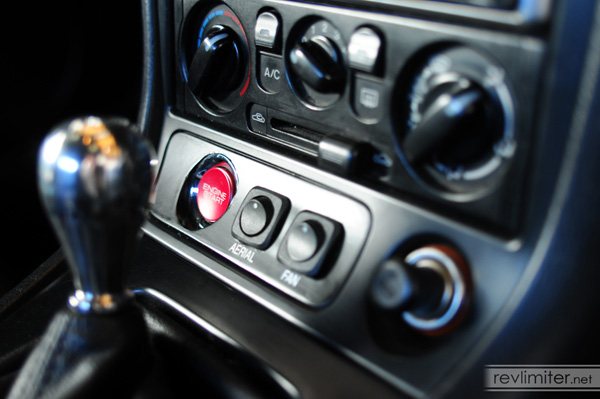
S2000 start button installed in my NB
Start Button How-to History
About the middle of 2001, I decided Sharka, my NA Miata, needed a starter button. I'd seen several installs written up online, but they all used regular old big red buttons. That didn't really appeal to me, till I saw the S2000 start button. It was big, red, came with a chrome bezel, and best of all, was cheap online. I wrote up a set of installation instructions. 10 years later, it is still one of the top 3 most popular pages on my website.
My NB languished without a start button for many years. I finally decided I deserved to start both of my Roadsters with a button. So out came my dremel and camera. This document is the result.
Your Shopping List
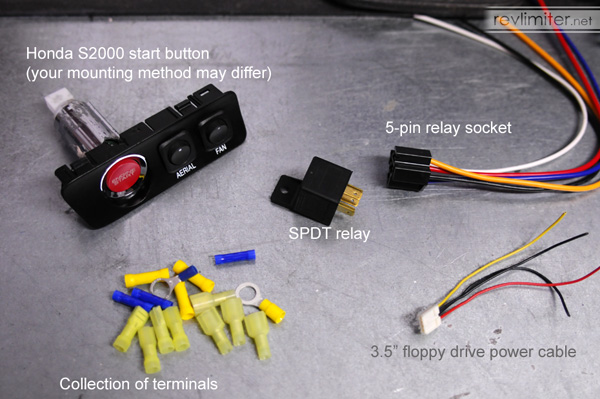
Start button parts
- One Genuine Honda S2000 Starter Button - HandA-accessories.com ref number 609. I'd recommend HandA-accessories.com for as a source for the button due to their extremely low price.
- One SPDT relay at 30amps/12 volts - Parts Express part number 330-070. That's a Single Pole Double Throw relay. You can find one here, as my #1 source of questions is "where do I get the relay?" I'd suggest ordering two (one spare).
- One 5-pin relay socket - Parts Express part number 330-075. Like the relay, this is also available here.
- One 3.5in internal computer power cable - Cables To Go part number 03165. You're basically looking for the type of power connector that your computer's 3.5" floppy drive (the old A: drive) uses. You can find a Y-adapter here. Just cut off one of the small connectors.
- ~Five feet of 12 gauge wire, and about the same amount of 18 gauge wire in your choice of colors.
- One large 12 gauge ring terminal to ground the relay to your steering column.
- ~Six male and six female 12 gauge insulated bullet-style crimp connectors.
- ~Three 22-26 gauge vampire taps to tap your handbrake and cigar lighter.
- ~Six insulated 18 gauge spade style crimp connectors for starter button wire connections.
- A nice crimping tool, a wire stripper, and wire cutters.
- Electrical tape
- Dremel tool with several small grinding attachments
FAQ
The Button: I have only installed the Honda S2000 start button. I've never done the ignited, the KG Works, any industrial buttons, or anything else, so I have no idea how they work. Sorry. To use these instructions properly, you need a Miata and an S2000 starter button from Honda. You can find this button for about $45 from your local Honda dealer, or for $35 from HandA-accessories.com
The Relay: The #1 source of questions is this relay. The first thing you should know, is that an SPST relay (single pole, single throw) won't work. The use of a SPST relay will result in your wipers, heater, and various other things on the IG2 circuit not working. "But wait, my 5 prong relay doesn't work either!" This is one I've heard many times. They sell SPST relays with 4 prongs and 5 prongs, usually with two 87 outputs. This will not work. You need an SPDT relay, with 5 prongs (that's an 87 and an 87a). You can find this relay at Parts Express, as I linked above, or very rarely at local auto parts stores such as Autozone. Keep in mind, that you're very likely to find the 5 pole SPST relay at these local shops.
The Car: These instructions are specific to the NB Mazda Miata (98-05). For NA instructions (90-97 Mazda Miata) go here. I have no idea how to wire up your (insert Make here) (insert Model here) ignition system. I'd recommend a Haynes manual, as they have excellent wiring diagrams in the back. Good luck!
How it works: Once you've got this hooked up as I outline in the instructions, you'll only be able to start your car with the S2000 starter button. Turning the key to the "start" position does nothing. "How do I hook it up to allow both to start my car?" Honestly, I don't know. I've never tried to redo the diagrams to allow both the key and the button to start the car. "Is it easier to steal the car now?" No. The S2000 button just replaces the "Start" position of your key switch. You still need the key to start the car.
The Master Diagram: By popular demand, I have created a master diagram of the start button, relay, relay harness, and the factory wiring. This will not make much sense to you at the beginning of the project, but if you keep referring back to it, most of your questions should be answered.
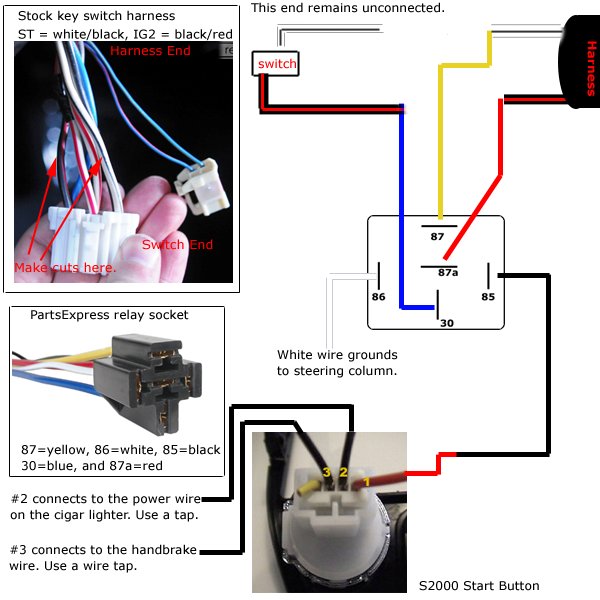
The master diagram: PRINT THIS!
S2000 Starter Button Install
Step 0: Get started.
Disconnect the negative cable from your battery. Safety first here. If you're too lazy to disconnect your battery, at least do all your work with no key in the ignition.
Step 1: Figure out where to mount your start button.
There's so many places and ways to mount your button, I'm not even going to try to get into it. I chose to modify a spare airbag control and relocate my airbag switch to the glovebox. But that's just me. Good luck on your mounting! Just go slow and plan every step.
Step 2: Wire the relay.
Wiring the relay
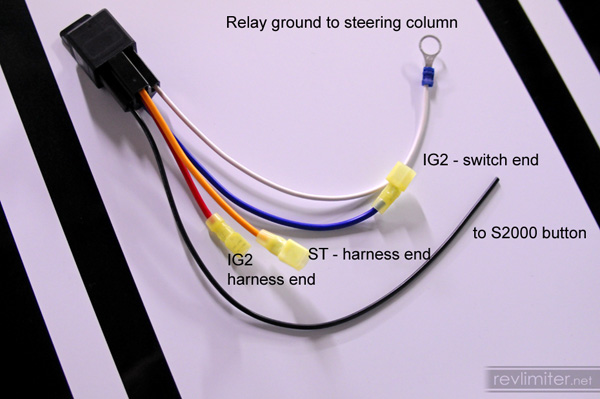
The relay socket makes life easy.
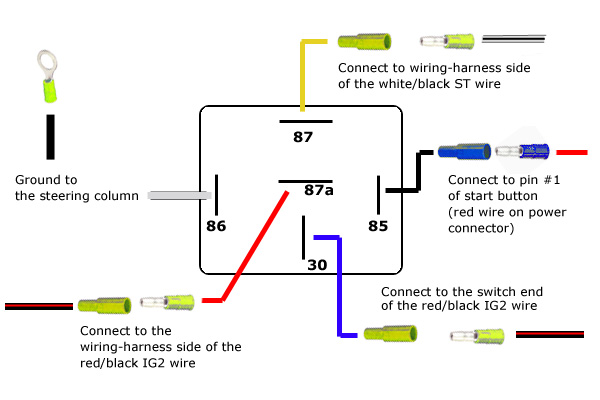
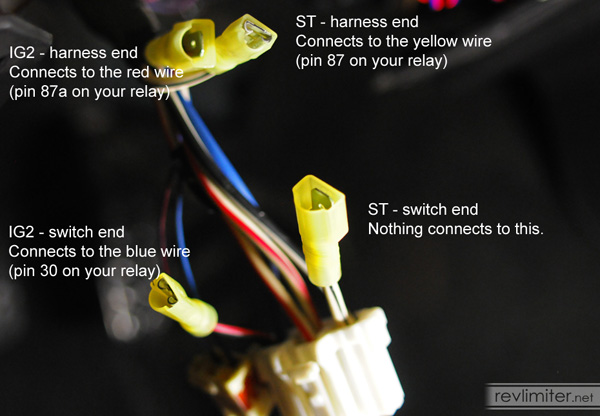
- Pin 87 - yellow - connects to the blue/black ST wire.
- Pin 85 - black - connects to your red #1 wire on your start button.
- Pin 30 - blue - connects to the red/black IG2 wire on the key switch.
- Pin 86 - white - connects to your steering column ground.
- Pin 87A - red - connects to the red/black IG2 wire going to toward the firewall
When you're ready to wire your relay, locate your bullet/spade terminals and crimp them onto each wire as shown in the above diagram. The photo helps you see just how short some of the wires on the relay socket need to be cut. Finally, connect pin 85 (black) on the relay socket to pin #1 (red) on your starter button's output wire.
Step 3: Modify the factory wiring harness.
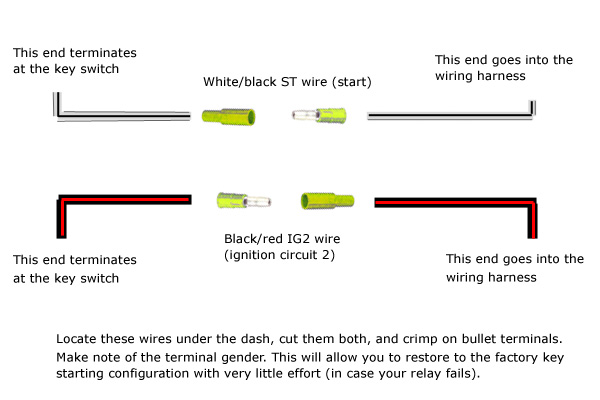
Factory wiring harness modification
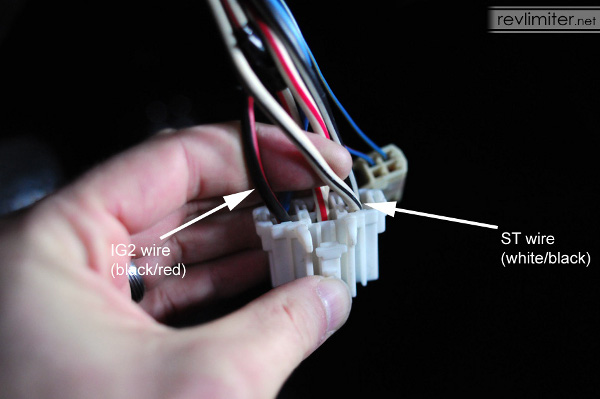
The starter switch wiring harness.
Cut and crimp.
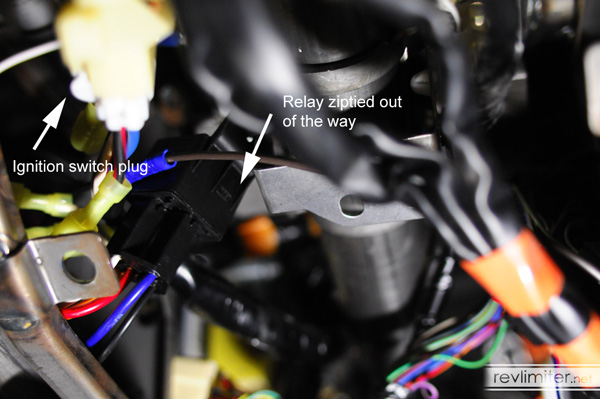
Plug in the relay.
And don't forget to plug that starter switch plug back in!
Step 4: Wire the start button.

Wiring the back of the starter button
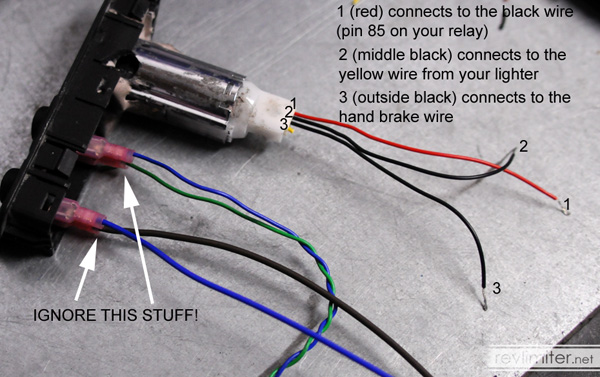
Wiring details
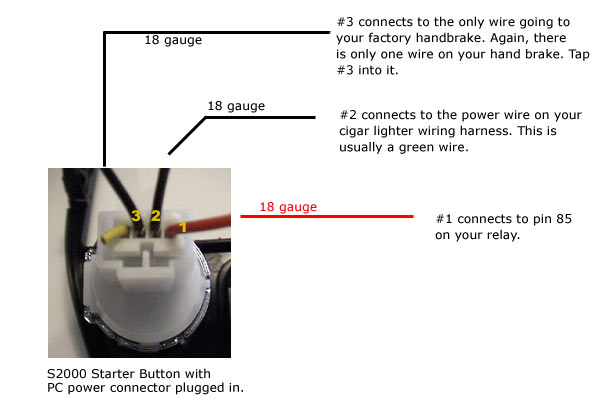
Yet another start button connection diagram.
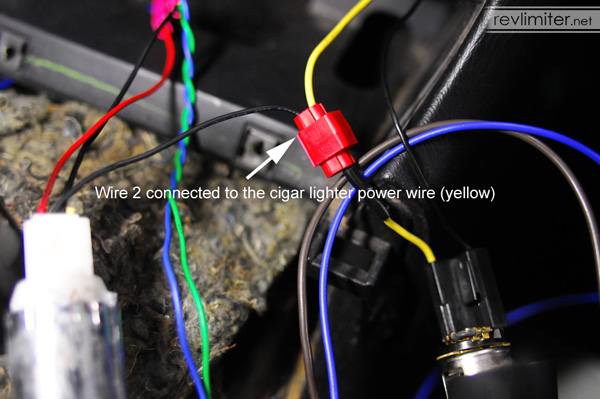
Connect to the lighter power.
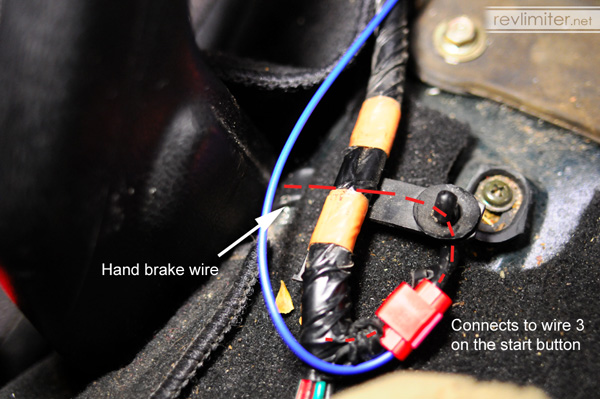
Connect the hand brake wire.
That's it. Aside from cleaning up your car and making everything pretty, your start button is now installed. Plug your battery back in and give it a press.
Step 5 (optional): Relocate your airbag/lighter/power mirror switch.
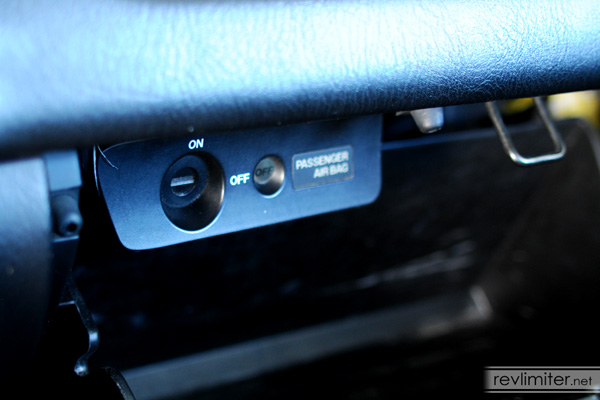
Relocated airbag control.
As for the airbag control, it's very easy to move around. The wiring harness is quite long. It's easy to free some of it from the factory electrical tape and stretch it out somewhere. I put mine in the glove box. My control is secured to the HVAC duct work (it runs along the "roof" of the glove box) with some double sided tape. Don't laugh, I used 5-lb-per-inch tape. VERY strong stuff. And I lined the entire top side of that little control box. It's bonded to the HVAC duct quite well. Maybe permanently!
If you choose to put your button in place of the power mirror switch, I'm not sure what to recommend. Perhaps cutting a square hole just below the OEM mirror switch location and snapping it in there? I considered doing this at first, but the airbag panel seemed much more inviting.
And that's it! Have fun starting your Roadster!
Additional pictures
Site Navigation
Latest Blog Posts
Where’s all the blog posts?!?!
Posted on Fri, 27 Jun 2025 19:59:51 +0000
 Why are you seeing 2013 blog posts in the "new posts" list? It's been a hard month for the revlimiter site.
Read more...
Mabel
Posted on Sat, 29 Jun 2024 03:42:43 +0000
 Who’s the dog that keeps showing up on the revlimiter Instagram? It’s Mabel, my ACD/Pomeranian service dog.
Read more...
CarbonMiata Vent Window Install/Review
Posted on Sun, 29 Jan 2023 14:57:01 +0000
 After waiting 23 years, there’s finally a pretty vent window kit on the market for the NA/NB Miata. Unfortunately, it doesn’t actually work well.
Read more...
NA Miata Ignition Switch Replacement / Refurbish
Posted on Fri, 12 Mar 2021 19:25:57 +0000
 Is your NA Miata not starting anymore? A bad ignition switch may be the problem.
Read more...
XIDA ND Suspension Install
Posted on Mon, 20 May 2019 20:01:01 +0000
 Mona dumps the soft GT suspension in favor of a set of XIDAs from Supermiata.
Read more...